Kodak EasyShare C703 Bedienungsanleitung
Stöbern Sie online oder laden Sie Bedienungsanleitung nach Filmkameras Kodak EasyShare C703 herunter. Kodak EasyShare C703 User's Manual Benutzerhandbuch
- Seite / 70
- Inhaltsverzeichnis
- FEHLERBEHEBUNG
- LESEZEICHEN
- Kodak EasyShare C743/C703 1
- Front view 3
- Back view 4
- Table of contents 1 5
- Table of contents 6
- 1 Setting up your camera 7
- Turning on the camera 8
- Setting up your camera 9
- 2 Taking pictures and videos 10
- Taking pictures and videos 11
- Using the flash 14
- Understanding review icons 16
- 3 Transferring and printing 18
- Printing pictures 20
- Ordering prints online 22
- 4 Doing more with your camera 23
- Picture-taking modes 24
- Scene modes 25
- Using the self-timer 26
- Using burst 27
- Doing more with your camera 28
- 24 www.kodak.com/go/support 30
- Video mode 30
- Customizing your camera 31
- 26 www.kodak.com/go/support 32
- Running a slide show 33
- Cropping pictures 35
- Copying pictures and videos 36
- Pre-tagging for album names 36
- Second—on your camera 37
- First—on your computer 37
- Sharing your pictures 38
- Tagging pictures for printing 39
- Tagging pictures as favorites 41
- 5 Troubleshooting 44
- Troubleshooting 45
- Camera ready light status 46
- LCD screen messages 48
- 44 www.kodak.com/go/support 50
- 6 Getting help 51
- 46 www.kodak.com/go/support 52
- 7 Appendix 53
- 48 www.kodak.com/go/support 54
- °F (0-40°C) 55
- Storage capacities 56
- Important safety instructions 57
- Battery life 58
- Extending battery life 59
- ° F (5° C). When using 59
- Warranty 60
- Limitations 61
- Your rights 61
- Regulatory compliance 62
- Australian C-Tick 63
- Canadian DOC statement 63
- Korean Class B ITE 63
- VCCI Class B ITE 64
Inhaltsverzeichnis
Kodak EasyShare C743/C703zoom digital cameraUser’s guidewww.kodak.comFor interactive tutorials, www.kodak.com/go/howtoFor help with your camera, www.k
4 www.kodak.com/go/support2 Taking pictures and videosTaking a pictureTaking a video1 2Press the Shutter button halfway to focus and set exposure. Whe
Taking pictures and videoswww.kodak.com/go/support 5Reviewing the picture or video just takenAfter you take a picture or video, the LCD displays a qui
6 www.kodak.com/go/supportTaking pictures and videosUnderstanding picture-taking iconsIn capture mode—no buttons pressed In capture mode—shutter press
Taking pictures and videoswww.kodak.com/go/support 7Using the auto-focus framing marks (to take pictures)When using the LCD as a viewfinder, framing m
8 www.kodak.com/go/supportTaking pictures and videosUsing the flash Use the flash when you take pictures at night, indoors, or outdoors in heavy shado
Taking pictures and videoswww.kodak.com/go/support 9Reviewing pictures and videos on your cameraPress the Review button to view and work with your pic
10 www.kodak.com/go/supportTaking pictures and videosUnderstanding review iconsPicturesVideosScroll arrowsEmail tagFavorite tagPrint tag/number of pri
Taking pictures and videoswww.kodak.com/go/support 11Deleting pictures and videos during reviewUsing the undo delete featureIf you accidentally delete
12 www.kodak.com/go/support3 Transferring and printing picturesInstalling the softwareCAUTION:Install EasyShare software before connecting the camera
Transferring and printing pictureswww.kodak.com/go/support 13Transferring pictures with the USB cableNOTE: Visit www.kodak.com/go/howto for an online
Eastman Kodak CompanyRochester, New York 14650© Eastman Kodak Company, 2006All screen images are simulated.Kodak and EasyShare are trademarks of Eastm
14 www.kodak.com/go/supportTransferring and printing picturesPrinting pictures Printing with a Kodak EasyShare printer dockDock your camera to the Kod
Transferring and printing pictureswww.kodak.com/go/support 15Printing from a PictBridge enabled printer1 Turn on the printer. Turn on the camera. The
16 www.kodak.com/go/supportTransferring and printing picturesOrdering prints onlineKodak EasyShare Gallery (www.kodakgallery.com) is one of the many o
www.kodak.com/go/support 174 Doing more with your cameraUsing optical zoomUse optical zoom to get up to 3X closer to your subject. Optical zoom is ef
18 www.kodak.com/go/supportDoing more with your cameraPicture-taking modesUse this mode ForAuto General picture taking—offers an excellent balance of
Doing more with your camerawww.kodak.com/go/support 19Scene modes1 Turn the Mode dial to Scene .2 Press to display Scene mode descriptions.NOTE: I
20 www.kodak.com/go/supportDoing more with your cameraUsing exposure compensation to adjust brightnessIn Auto, you can adjust exposure compensation to
Doing more with your camerawww.kodak.com/go/support 21Using burst1 In most Still modes, press the Burst button.2 Press the Shutter button halfway to f
22 www.kodak.com/go/supportDoing more with your cameraChanging picture-taking settingsYou can change settings to get the best results from your camera
Doing more with your camerawww.kodak.com/go/support 23White BalanceChoose your lighting condition.Auto (default)—automatically corrects white balance.
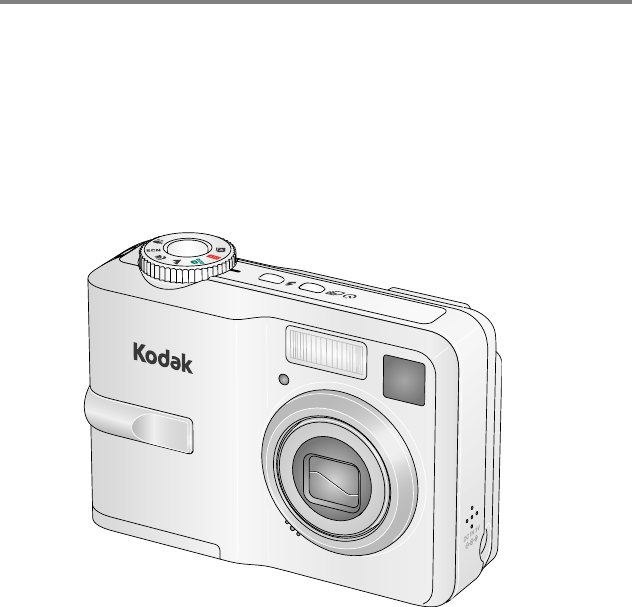
Product featureswww.kodak.com/go/support iFront view1 Shutter button 7 Viewfinder2Mode dial 8Lens3 Self-timer/Video light 9 Speaker4 Flash button 10 D
24 www.kodak.com/go/supportDoing more with your cameraLong Time ExposureChoose how long the shutter stays open.0.5 - 4.0 secondsSet AlbumChoose Album
Doing more with your camerawww.kodak.com/go/support 25Customizing your cameraUse Setup to customize your camera settings.1 In any mode, press the Menu
26 www.kodak.com/go/supportDoing more with your cameraAuto Power OffChoose inactivity time until camera turns off.10 minutes5 minutes3 minutes (defaul
Doing more with your camerawww.kodak.com/go/support 27Running a slide showUse the Slide Show to display your pictures/videos on the LCD. To run a slid
28 www.kodak.com/go/supportDoing more with your cameraChanging the slide show display intervalThe default interval setting displays each picture for 5
Doing more with your camerawww.kodak.com/go/support 29Cropping picturesThe picture is copied, then cropped. The original picture is saved. A cropped p
30 www.kodak.com/go/supportDoing more with your cameraCopying pictures and videosYou can copy pictures/videos from a card to internal memory or from i
Doing more with your camerawww.kodak.com/go/support 31Second—on your camera1 In any mode, press the Menu button.2 Press to highlight Set Album , th
32 www.kodak.com/go/supportDoing more with your cameraSecond—on your camera1 Press the Review button, then locate the picture or video.2 Press the Men
Doing more with your camerawww.kodak.com/go/support 33Tagging pictures for printing1 Press the Share button. Press to locate a picture. 2 Press to
ii www.kodak.com/go/supportProduct featuresBack view1 LCD 11 Strap post2 Viewfinder 12 SD or MMC card (sold separately)3 Ready light 13 USB, A/V Out4
34 www.kodak.com/go/supportDoing more with your cameraSecond—tag pictures/videos on your camera1 Press the Share button. Press to locate a picture/v
Doing more with your camerawww.kodak.com/go/support 35Tagging pictures as favoritesYou can preserve your favorite pictures in the Favorites section
36 www.kodak.com/go/supportDoing more with your cameraOptional settingsIn Favorites mode, press the Menu button to access optional settings.NOTE: Pic
Doing more with your camerawww.kodak.com/go/support 37Printing and emailing favorites1 Turn the Mode dial to Favorites . Press to locate a picture.
38 www.kodak.com/go/support5 TroubleshootingFor step-by-step product support, visit www.kodak.com/go/c743support or www.kodak.com/go/c703support and s
Troubleshootingwww.kodak.com/go/support 39In Review mode, you do not see a picture (or the expected picture) on the LCD screen. Check the image stora
40 www.kodak.com/go/supportTroubleshootingCamera ready light statusPicture is too dark. Turn on the flash (page 8). Move so there is no more than 1
Troubleshootingwww.kodak.com/go/support 41Camera/computer communicationsReady light blinks green. Camera is operating normally.Ready light blinks amb
42 www.kodak.com/go/supportTroubleshootingLCD screen messagesCannot transfer pictures. (The Add New Hardware Wizard cannot locate drivers.) Disconnec
Troubleshootingwww.kodak.com/go/support 43Internal memory requires formatting Format the internal memory (page 25).Caution: Formatting deletes all pi
www.kodak.com/go/support iiiTable of contents 11 Setting up your camera ...1A
44 www.kodak.com/go/supportTroubleshootingNo address book on camera (Connect with computer to import address book) Create and copy address book from
www.kodak.com/go/support 456 Getting helpHelpful linksCameraSoftwareOtherEmail, write, or phone customer support www.kodak.com/go/contactGet support
46 www.kodak.com/go/supportGetting helpNOTE: If you have questions concerning this product, you may speak with Kodak customer support.Australia 1800
www.kodak.com/go/support 477 AppendixCamera specificationsFor more specifications, visit www.kodak.com/go/c743support or www.kodak.com/go/c703support
48 www.kodak.com/go/supportAppendixDigital zoom 5.0X continuous with 0.2X incrementsNot supported for video captureExposureExposure metering TTL-AE; C
Appendixwww.kodak.com/go/support 49ReviewQuickview YesVideo output NTSC or PAL selectablePower2 Kodak oxy-alkaline digital camera batteries AA ZR6 (no
50 www.kodak.com/go/supportAppendixStorage capacitiesActual storage capacity varies depending on subject composition, card brand, and other factors. Y
Appendixwww.kodak.com/go/support 51Important safety instructionsCAUTION:Do not disassemble this product; there are no user-serviceable parts inside. R
52 www.kodak.com/go/supportAppendix Do not charge non-rechargeable batteries. Remove the battery when the product is stored for an extended period o
Appendixwww.kodak.com/go/support 53Extending battery life See Auto Power Off on page 26. Limit the following activities that quickly deplete battery
iv www.kodak.com/go/supportTable of contentsSharing your pictures... 3
54 www.kodak.com/go/supportAppendix Service agreements may be available in your country. Contact a dealer of Kodak products for more information. Fo
Appendixwww.kodak.com/go/support 55LimitationsRequest for Warranty service will not be accepted without proof of date of purchase, such as a copy of t
56 www.kodak.com/go/supportAppendixThis warranty gives you specific rights, and you may have other rights which vary from state to state or by jurisdi
Appendixwww.kodak.com/go/support 57Any changes or modifications not expressly approved by the party responsible for compliance could void the user’s a
58 www.kodak.com/go/supportAppendixVCCI Class B ITEMPEG-4Use of this product in any manner that complies with the MPEG-4 visual standard is prohibited
www.kodak.com/go/support 591 IndexAA/V out, 28AA battery, loading, 1about picture, video, 29about this camera, 27accessories, 13battery, 53buying, 45
60 www.kodak.com/go/supportIndexcolor mode, 23compatibility, dock, 16copy picturescard to memory, 30memory to card, 30to computer, 12cropping pictures
www.kodak.com/go/support 61IndexIiconblur, 5iconspicture-taking, 6reviewing pictures, 10icons, mode dial, 18image storage, 24info button, iiinformati
62 www.kodak.com/go/supportIndexOOK button, iionline prints, ordering, 16optical zoom, 17orientation sensor, 26Pparty, 19PictBridge enabled printer, 1
www.kodak.com/go/support 63Indexprinting from, 16storage capacities, 50self-timerwith pictures, 20service and support telephone numbers, 46settingabo
www.kodak.com/go/support 11 Setting up your cameraAttaching the strapLoading the batteryFor battery types, see page 52. To extend battery life, see p
64 www.kodak.com/go/supportIndexfor email, 33for print, 33taking a picture, 4taking a video, 4telephone support, 46telephoto button, iitelevision, sli
2 www.kodak.com/go/supportSetting up your cameraTurning on the cameraSetting the language, date/time21to change.for previous/next field.OKto accept.OK
Setting up your camerawww.kodak.com/go/support 3Setting the language, date/time in the futureStoring pictures on an SD or MMC cardYour camera has 32 M
Verwandte Produkte und Handbücher für Filmkameras Kodak EasyShare C703
 (28 Seiten)
(106 Seiten)
(28 Seiten)
(106 Seiten)

 (106 Seiten)
(251 Seiten)
(106 Seiten)
(251 Seiten)
© 2020, manymanuals.de. Alle Rechte vorbehalten. | 2.761 s |
 Manymanuals.com
 Manymanuals.de
 Manymanuals.fr
 Manymanuals.it
 Manymanuals.pl
 Manymanuals.cz
 Manymanuals.es
 Manymanuals-pt.com
Kommentare zu diesen Handbüchern